
Discover 7 easy DIY drip irrigation systems you can build with simple hardware store parts. Save water, cut costs, and make gardening effortless with these smart ideas.
- 🌱 Introduction
- 💧 Why Choose DIY Drip Irrigation Systems?
- 🧰 Essential Hardware Store Parts You’ll Need for DIY Drip Irrigation Systems
- 🪴 Step-by-Step: Building Your DIY Drip Irrigation System
- 🌿 7 Simple DIY Drip Irrigation System Designs You Can Build Today
- ⚙️ Smart Add-Ons to Make Your System Smarter
- 🧰 Troubleshooting Common Problems
- 🔧 Maintenance Tips for Long-Lasting Efficiency
- ❓ Frequently Asked Questions (FAQ)
- 🌻 Conclusion – Build Smarter, Water Wiser
🌱 Introduction
If you’ve ever come home after a long day to find your plants drooping under the sun or your water bill higher than expected, you’re not alone. Hand-watering your garden may feel therapeutic at first, but it’s one of the least efficient ways to care for your plants. Most of the water never even reaches the roots — it evaporates, runs off, or simply floods the topsoil. That’s where DIY drip irrigation systems come in — a smart, sustainable, and surprisingly simple solution that any home gardener can build with just a few basic hardware store parts.
Unlike traditional sprinklers or manual watering cans, DIY drip irrigation systems deliver water directly to the root zone of each plant, drop by drop. The result? Healthier plants, less water waste, and more time for you to relax and enjoy your garden instead of constantly managing it. These systems don’t just conserve resources — they also promote deep root growth, reduce weed germination, and prevent fungal diseases caused by overwatering.
You don’t need to be an engineer or own a sprawling backyard to build one. Whether you’re nurturing herbs on your balcony, maintaining vegetable rows in your backyard, or designing a sustainable community garden, you can create an effective irrigation setup for less than the cost of a single store-bought kit. Using parts like tubing, connectors, filters, and timers — all readily available at your local hardware shop — you can easily customize your watering layout to suit your space and plant types.
What makes DIY drip irrigation systems even more appealing is their adaptability. You can keep them completely manual, running off a simple hose connection, or upgrade them with smart timers, WiFi sensors, or even solar-powered controllers to automate your watering schedule. With a little planning, your system can practically water your garden on autopilot — giving every plant the attention it deserves while you save up to 70% of your total water use.
In this comprehensive guide, we’ll walk you through seven easy and affordable DIY drip irrigation systems you can build today using basic materials from any local hardware store. From gravity-fed bottle setups to solar-assisted smart irrigation, each design blends innovation with practicality — proving that sustainable gardening doesn’t have to be expensive or complicated.
By the end of this post, you’ll know exactly how to plan, assemble, and maintain your own DIY drip irrigation systems — helping you grow smarter, water wiser, and garden greener all year long. 🌿
💧 Why Choose DIY Drip Irrigation Systems?
Every gardener dreams of lush, thriving plants — but few realize how much of their watering efforts go to waste. Traditional watering methods like sprinklers or hoses often soak the leaves instead of the roots, leading to evaporation, runoff, and even plant diseases. If you’ve struggled with overwatered pots, undernourished roots, or inconsistent growth, it’s time to rethink your approach. That’s where DIY drip irrigation systems truly shine.
🌿 The Smart Way to Water
Unlike surface watering, DIY drip irrigation systems deliver water directly to the soil’s root zone — slowly and steadily. This allows moisture to penetrate deeper into the soil, where it’s actually needed most. Because each drop is measured, you can significantly reduce water waste — often by up to 70% compared to traditional methods. This efficiency not only helps the planet but also keeps your water bills in check, making drip systems one of the most cost-effective upgrades any gardener can implement.
Here’s a simple visual flow of how the process works:
[Water Source]
↓
[Filter & Pressure Regulator]
↓
[Tubing Network]
↓
[Emitters at Each Plant Root]
↓
[Consistent, Targeted Watering]
🌻 Eco-Friendly and Low-Maintenance
One of the biggest advantages of DIY drip irrigation systems is their sustainability. They minimize evaporation, eliminate waterlogging, and allow gardeners to use recycled water or even rainwater for irrigation. Once installed, these systems require very little upkeep — just occasional cleaning of filters and emitters. That means less manual work, less waste, and more free time to enjoy the beauty of your garden.
🌞 Ideal for Every Garden Type
Whether you’re tending balcony herbs, growing vegetables in raised beds, or cultivating flowers across a large lawn, DIY drip irrigation systems can be adapted to any scale. They’re perfect for busy urban gardeners, senior hobbyists, and eco-conscious families alike. Plus, you can easily expand or modify your system as your garden evolves — adding new lines, emitters, or even a timer without major reinstallation.
In short, DIY drip irrigation systems combine precision, affordability, and environmental responsibility — three pillars of modern gardening. They’re not just about watering your plants efficiently; they’re about watering with intention. With a little effort today, you’ll create a system that rewards you with consistent growth, healthy roots, and the satisfaction of knowing you’re gardening smarter, not harder.
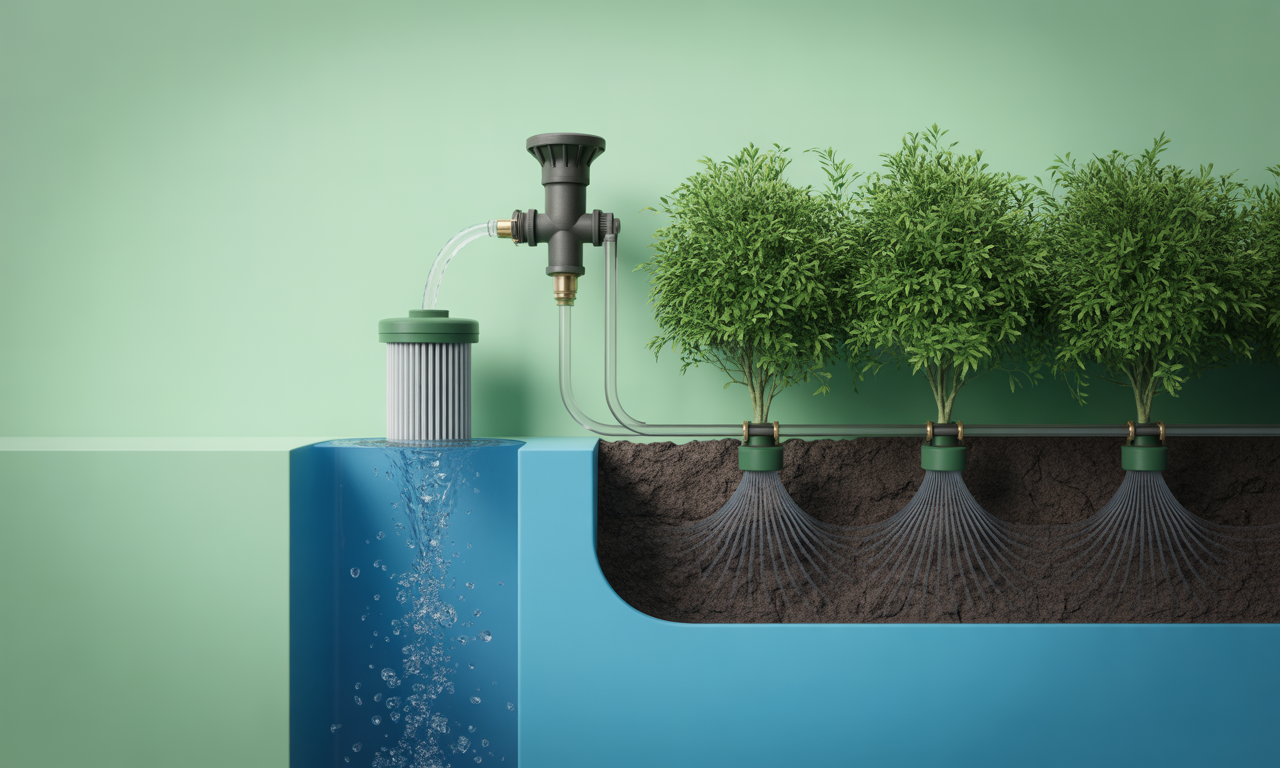
🧰 Essential Hardware Store Parts You’ll Need for DIY Drip Irrigation Systems
Before you start assembling your system, you’ll need a few basic materials that are easily available at your local hardware or gardening supply store. The great news is that most of the components for DIY drip irrigation systems are affordable, reusable, and simple to handle — even for first-time gardeners.
Think of these parts as your garden’s plumbing network. Each piece plays a unique role in delivering consistent water to your plants without wasting a single drop. Whether you’re creating a small balcony setup or a full vegetable patch irrigation line, this table will help you understand what you need, why you need it, and how much it costs to get started.
🌿 Basic Parts List for DIY Drip Irrigation Systems
| Component | Purpose | Approx. Cost (USD) | Pro Tip |
| Poly Tubing (¼” & ½”) | Acts as the main water channel that carries water across your garden. | $5–$15 (per 25–50 ft) | Go for UV-resistant tubing; it lasts longer under sunlight. |
| Drip Emitters | Control the flow of water directly to each plant’s root zone. | $0.30–$1 per piece | Choose adjustable emitters for plants with different watering needs. |
| Connectors & Tees | Help you split or extend water lines between rows of plants. | $3–$10 per pack | Keep extras on hand for layout changes or expansions. |
| End Caps & Plugs | Seal off unused ends of the tubing. | $1–$3 each | Use removable end caps to make seasonal cleaning easier. |
| Filter | Removes dirt, sand, and debris that could clog emitters. | $5–$10 | Clean filters monthly to maintain smooth water flow. |
| Pressure Regulator | Maintains steady pressure for even distribution. | $8–$15 | Opt for one rated between 15–30 PSI for small gardens. |
| Timer (Optional) | Automates watering schedules for convenience. | $15–$35 | Digital timers save both time and water by scheduling precision cycles. |
| Hole Punch Tool | Creates precise holes in tubing for emitters. | $2–$5 | Use a proper punch to avoid damaging the tubing. |
| Stake Holders or Clips | Keep tubing firmly in place along the ground. | $5–$8 per pack | Stainless steel clips are best for long-term setups. |
💧 Pro Insight
When assembling DIY drip irrigation systems, always start small. Build one section, test the water flow, and then expand gradually. This not only ensures even watering but also helps identify leaks early. You can even reuse these same parts later for system upgrades or when shifting garden layouts.
Also, remember: the flexibility of DIY drip irrigation systems lies in the mix-and-match nature of these components. You can combine tubing diameters, vary emitter types, or attach timers to automate your setup. All you need is a little planning and the right tools — and your garden will soon take care of itself.
🪴 Step-by-Step: Building Your DIY Drip Irrigation System
Now that you’ve gathered your materials, it’s time to put your plan into action. The process of assembling DIY drip irrigation systems is surprisingly simple once you understand the flow. Think of it as building a mini plumbing network designed to deliver life directly to your plants — one drop at a time.
🌿 Step 1: Plan Your Layout
Every great garden system starts with a smart plan. Sketch your garden bed or balcony setup on paper, marking where each plant sits. Draw lines to show how the tubing will reach each plant. This layout helps determine how much tubing, connectors, and emitters you’ll need.
💡 Pro Tip: Keep tubing lines short and direct for better pressure control in DIY drip irrigation systems.
💧 Step 2: Connect the Tubing to the Water Source
Attach one end of your main tubing to your water supply — whether it’s a garden faucet, outdoor tap, or rain barrel. Secure it tightly with a connector or threaded adapter. Add a filter and pressure regulator between the tap and the tubing to ensure clean, even flow.
💡 Pro Tip: For eco-friendly setups, connect your system to a rain barrel or recycled water source.
🔩 Step 3: Install the Tubing Network
Lay the tubing along your planned path. Use stakes or clips to hold it in place and prevent shifting. For branching areas, use “T” connectors to split the flow into multiple lines. Avoid sharp bends, as they can restrict pressure and cause leaks.
[Water Source] → [Filter] → [Regulator] → [Main Tubing]
↘
[Emitters → Plants]
💡 Pro Tip: In large DIY drip irrigation systems, use thicker (½-inch) tubing for main lines and smaller (¼-inch) tubing for extensions.
🌱 Step 4: Add Drip Emitters
Use a hole-punch tool to make small holes in the tubing near each plant. Insert emitters carefully and ensure they’re snug. Each emitter should face the base of the plant for accurate watering. Choose adjustable emitters if you’re watering plants with different moisture needs.
💡 Pro Tip: For containers, use one emitter per pot; for large shrubs, two or more emitters ensure balanced coverage.
🔧 Step 5: Seal and Test Your System
Attach end caps or plugs at the tubing ends to prevent leaks. Turn on the water and observe each emitter. Check for even flow and fix any leaks by tightening connectors or replacing loose fittings. Once tested, you can bury the tubing slightly under mulch to protect it from sunlight and wear.
💡 Pro Tip: Run your DIY drip irrigation systems for 10–15 minutes per session in early morning or late evening for maximum efficiency.
⚙️ Step 6: Add Automation (Optional)
To make your system even smarter, attach a timer or smart controller to your faucet. This automates watering schedules, saving time and reducing water waste. Some gardeners even connect WiFi timers or solar-powered pumps for a fully self-sustaining irrigation setup.
🌿 Quick Summary Flowchart
[Plan Layout] → [Connect Tubing] → [Install Network]
→ [Add Emitters] → [Seal & Test] → [Automate & Maintain]
🌿 7 Simple DIY Drip Irrigation System Designs You Can Build Today
Building a watering system doesn’t have to be complicated or expensive. These seven DIY drip irrigation systems can be built using basic materials you already have or can buy easily from a local hardware store.
1️⃣ Bucket-to-Drip System (No Electricity Needed)
Perfect for small balcony gardens or raised beds, this system uses gravity to deliver steady water flow.
- How It Works: Fill a large bucket with water, connect tubing at the bottom with a simple valve or tap, and let gravity pull water through the emitters.
- Why It’s Great: No pump or electricity needed — ideal for eco-conscious gardeners.
💡 Pro Tip: Place the bucket at least 2–3 feet above the plant level for proper flow pressure.
2️⃣ Gravity-Fed Bottle Irrigator
This is the simplest version of DIY drip irrigation systems — perfect for container gardens.
- How It Works: Use recycled plastic bottles, poke tiny holes in the cap, and insert them upside down into the soil near the plant roots.
- Why It’s Great: Cheap, portable, and perfect for travelers or busy gardeners.
💡 Pro Tip: Adjust hole size based on soil moisture needs.
3️⃣ PVC Pipe Drip Setup
For larger gardens or long vegetable rows, a PVC setup is efficient and durable.
- How It Works: Drill evenly spaced holes along a PVC pipe and connect it to your water source with a pressure regulator.
- Why It’s Great: Even water distribution and high durability.
💡 Pro Tip: Wrap pipes in burlap or mulch to protect from heat and UV exposure.
4️⃣ Soaker Hose Conversion
Turn a regular garden hose into a soaker line by puncturing tiny holes along its length.
- How It Works: Lay it between rows and connect it to your water source.
- Why It’s Great: Extremely simple for vegetable beds and flower patches.
💡 Pro Tip: Pair with a timer for automatic operation.
5️⃣ Rain Barrel + Drip Combo
This sustainable DIY drip irrigation system collects and reuses rainwater.
- How It Works: Attach tubing and a filter to a rain barrel outlet. Gravity helps feed water through the emitters.
- Why It’s Great: Eco-friendly and cost-saving, especially in rainy regions.
💡 Pro Tip: Add a mesh screen on top to prevent debris and mosquitoes.
6️⃣ Smart Timer Drip System
If you love automation, this one’s for you.
- How It Works: Connect your drip setup to a timer that controls watering cycles.
- Why It’s Great: Saves time, water, and guesswork — ideal for busy urban gardeners.
💡 Pro Tip: Use a battery-powered or WiFi-enabled timer to integrate with your smartphone.
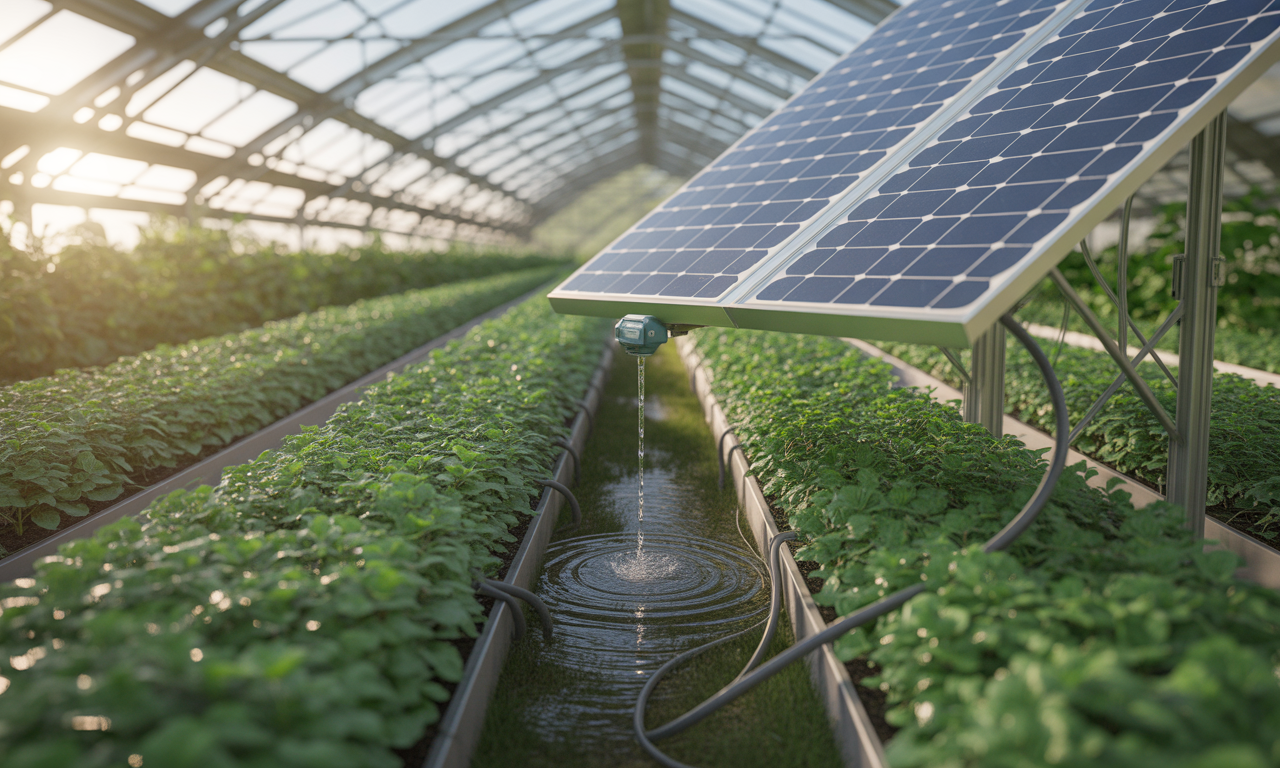
7️⃣ Solar-Powered Drip Irrigation
A futuristic solution for tech-savvy gardeners.
- How It Works: Solar panels power a small pump connected to your tubing system.
- Why It’s Great: Fully self-sustaining, uses renewable energy, and works anywhere with sunlight.
💡 Pro Tip: Ideal for remote gardens or community green zones.
⚙️ Smart Add-Ons to Make Your System Smarter
Enhancing your DIY drip irrigation systems with smart accessories can save more time and optimize efficiency.
| Add-On | Function | Benefit |
| WiFi Timer | Automates watering remotely | Control from your phone |
| Moisture Sensor | Detects soil dryness | Prevents overwatering |
| Rain Sensor | Pauses system during rain | Saves water |
| Solar Pump | Uses solar power | Eco-friendly automation |
| Smart Hub Integration | Links with Alexa or Google Home | Voice-controlled gardening |
💡 Pro Tip: Pairing your system with smart sensors ensures every drop is used effectively — giving you real-time control of your garden’s hydration levels.
🧰 Troubleshooting Common Problems
Even the best DIY drip irrigation systems can develop small issues over time. Here’s a quick guide to diagnosing and fixing them:
| Problem | Likely Cause | Quick Fix |
| Weak flow or dry patches | Clogged emitters | Soak in vinegar overnight to remove mineral buildup |
| Uneven watering | Unequal tubing lengths | Use pressure-compensating emitters |
| Leaks at connections | Loose fittings | Tighten or replace connectors |
| Water pressure too low | Too many emitters | Split the layout into smaller zones |
| Algae growth in tubing | Sunlight exposure | Cover with mulch or black tape |
💡 Pro Tip: Check the system weekly during peak summer months and flush lines every 4–6 weeks to maintain smooth flow.
🔧 Maintenance Tips for Long-Lasting Efficiency
A well-built DIY drip irrigation system can last for years with minimal upkeep.
Follow these maintenance habits to keep it running at peak performance:
- ✅ Flush lines monthly to remove sediment buildup.
- ✅ Replace damaged tubing or clogged emitters immediately.
- ✅ Inspect filters and regulators every season.
- ✅ Drain water before winter to prevent freezing.
- ✅ Store portable components (like timers) indoors during extreme temperatures.
💡 Pro Tip: Add a reminder in your calendar for seasonal checks — a few minutes of maintenance saves hours of reinstallation later.
❓ Frequently Asked Questions (FAQ)
Q1. What are DIY drip irrigation systems?
They are self-built watering systems that deliver water directly to plant roots using tubing, emitters, and connectors — conserving water and ensuring consistent moisture.
Q2. Are DIY drip irrigation systems expensive to install?
Not at all. Most setups cost under $50 and can be expanded over time using inexpensive hardware store parts.
Q3. How much water do these systems save?
On average, DIY drip irrigation systems can reduce water usage by up to 60–70% compared to manual watering or sprinklers.
Q4. Can I automate my DIY drip irrigation system?
Yes. Add a timer or smart controller to set watering schedules automatically. WiFi-enabled devices even allow control from your phone.
Q5. What is the best tubing size for a home garden?
For small to medium gardens, use ¼-inch tubing for branches and ½-inch tubing for mainlines to maintain stable water flow.
Q6. How often should I clean or maintain the system?
Clean filters monthly and flush the lines every 4–6 weeks to prevent blockages and mineral buildup.
Q7. Can I use rainwater in my drip irrigation system?
Yes, provided it’s filtered. Rain barrels connected to filters and regulators make a sustainable water source.
🌻 Conclusion – Build Smarter, Water Wiser
Every drop of water counts, and with DIY drip irrigation systems, you make each one meaningful. Whether you’re growing herbs on a sunny balcony or managing a vegetable patch, these systems simplify watering while aligning with eco-friendly living.
You don’t need fancy tools or expensive equipment — just creativity, patience, and a few basic components. With smart add-ons and regular upkeep, your system will serve you season after season, helping plants thrive while conserving precious resources.
When you install your own DIY drip irrigation system, you’re not just gardening — you’re engineering a self-sustaining ecosystem. 🌿
✨ Now it’s your turn: Which DIY drip irrigation system will you try first? Share your experiences or pictures in the comments below and inspire others to grow greener, smarter, and better — the Gardeniva way.
💡Looking for something different? Check out our latest post here: https://gardeniva.com/ai-smart-planter-review-2025/